So, when we decided to buy our house, we were sure we were going to change out pretty much everything. Sitting in our living room right now, I am looking at floors that need refinishing and feeling the December chill through 70 year old windows. Ew.
While we were becomings owners of the house we'd been renting, we debated what our first project would be: bathroom or kitchen? Both are dramatic "befores." Kitchen: gross and falling apart. Bathroom: gross and moldy. When water started dripping under the kitchen sink and then pooling on the floor of the basement (I did say it was gross) we picked the kitchen.
So, when I told my dad we were redoing the kitchen, he said it would take 1 year and cost us 70,000. Because that's what it takes.
I like arguing, and I thought he was crazy, so I looked it up. People really spend like a year on their kitchens. And they really spend like $50,000. Which is insane. So we spent less money and less time and got exactly what we want and had some fun.
So this starts is the story of how the Jensons spent a couple of months and less than $7,000 and got a totally awesome kitchen while learning how to do plumbing and stuff.
12.07.2010
11.09.2010
Fall already??
Wowzas, it seems like yesterday was January, so when we needed to order Christmas cards and have started talking about Thanksgiving, I was totally caught off guard. I know everyone is busy--really busy--and life over at the Jenson house is no exception. I am afraid we fell off the blogging wagon for several weeks. School is back in full swing, and we are both studying and working and falling into bed exhausted after classes, work, debate, and house projects. We went from tons of time outside in our gardens or indoors working on our new kitchen (pictures to come soon) to hours on end sitting inside, wistfully remembering time working in our garden. Time flies, doesn't it?
We've been enjoying roasted squash and baked potatoes. I am glad to say we had a ample potato crop, although our sweet potatoes were pretty skimpy--I planted 6 vines (not seeds, but actual vines) and we only got 1 decent sized one, along with 4 or so itty bitty babies. We did plant them really late, so maybe next year will be better. Just hard to find those sweet potatoes. I am hoping to grow winter squash next year. We planted some summer squash this year, but it was pitifully overtaken by the cucumber plants. So, you live and learn.
Hopefully, hopefully, we can start working on a few projects before the time comes for a new calendar We've been working on making little changes to our house to make it more suit our needs and our style since we bought it, and next on our list is:
1. Finishing the kitchen. We are done with all of the functional stuff (!) but trim, paint, and grout needs to be finished. While it was mega-stressful, I am pretty much amazed by what we have created.
2. Hanging up the trim in the 2nd bedroom
3. Taking on the bedroom. Ever since we have started sharing a bed, we have been using some not-so-stylish Ikea furniture, which has gotten pretty beaten up with all of our moves. I am really looking forward to coming up with something a bit more comfy
4. Getting some reasonable blinds for our windows. The creepy canvas curtains i made when we moved in look terrible, but more than that, they don't even cover our whole windows--which is a bit awkward in the bathroom.
Gotta find something to do when the ground freezes!
Be back soon--I promise!
Allison and Desmond
8.25.2010
Canstravaganza 2010, part 1
So there are 365 dinners in a year. You can take out the requisite fancy dinners that other people make, like thanksgiving, and the nights out to eat for birthdays, and you still have, something like 350 dinners to figure out. Now, I like to cook, so in the Jenson house we don't do a lot of frozen pizza or mac and cheese. That means 350 nights of chopping and peeling and cleaning and browning? NO! We do have one convenience food that we truly love: Spaghetti. Yum!
So, I had a great thought: what if we canned up some spaghetti sauce and tomatoes to use for our weekly spaghetti dinners? THAT WOULD BE AWESOME!
Then, when strolling the streets of the wicked cool St Paul Farmer's Market, my Mother in law and I came across giant boxes of roma tomatoes, for just $12. SUCH a good deal. seriously. It's like $50 of tomatoes. I had a canner and Desmond and I ran out and got quart jars and canning salt, and we figured it out. Steps to canning tomatoes (please do more research than my blog):
1. Get some tomatoes, canner, can lifter, lids, canning salt, and some water. Oh, and get some ice. Run the jars through the dishwasher to sterilize them (if you are lucky, your dw will have a sterilize setting like ours does. We are lucky)
2. Put a pot of water on the stove to boil while you wash your tomatoes. If you have tomatoes with pesticides on them, I would use that veggie wash if I were you. Tomatoes have thin skins and the chemicals will get into your food in the boiling water.
3. When the water is boiling, put the tomatoes into the boiling water. Watch the tomatoes, and pull them out of the water as soon as you see the skin split. Put the tomato into the ice water.
4. When the tomatoes have cooled a little, peel the skin off. Try to get only the outermost skin.
5. Now you have choices: can them as they are, throw a few pieces of basil or hot peppers into the jar, make some salsa, spaghetti sauce, or dice or crush them. Put some canning salt and some sugar in to each jar (2:1 sugar to salt)
6. Whatever you do, pack those jars as tight as you can. Wipe the rims and then slap a lid on that sucker and put the rim on it.
7. Fill up your canner with water and get it to boil. The canner will be huge and will sit awkwardly on top of the stove, but it will work out fine.
8. Put the jars into the can putter-inner thing that comes with the canner and then put it into the boiling water. Make sure the water covers the tops of the cans by an inch or two.
9. Put the lid on and let that puppy boil for a while. Recipes I have used have anything from 30 minutes to 1hour 25 minutes.
10. Take the jars out and let them sit undisturbed, away from drafts, somewhere to cool for about 12 hours. I would suggest setting them on cookie sheets with a lip on them to avoid water everywhere.
11. After a couple of hours, check the cans to make sure that they are sealed by flicking the tops. If they sound solid and don't give at all, you are golden. If not, use that jar right away, stick it in the fridge, or try to re-seal. We did 14 jars (our 15th didn't fill up quite all the way, so it's in our fridge right now), and we had to re-seal one. No problemo.
Pictures to come. Oh, and pictures of our new kitchen, now proudly featuring a sink, stove, fridge, and dishwasher. Nice!
Have a happy canning season!
Allison
8.05.2010
So this is a long time coming.....
Oh man, I don't even know how long it has been since my last blog post, you guys. Way too long, you're right. Sorry buddies. We have had a hectic couple of months. We closed on our house, and we are now homeowners with a mortgage and everything. Like real adults. Seems a little weird, but I guess I am not a kid anymore. I taught summer school, and Desmond is continuing his job as a research assistant.
On the home front, we have been renovating our kitchen. So far, we demo-ed it. To the studs. Since then we have run new electrical, new plumbing, installed new windows, insulated, and widened a doorway. We are doing everything ourselves, with the help of lovely, talented family members. Well, except we are paying a guy to do our countertops. We have been hanging drywall and are hoping (praying, even) that we will get to install our new flooring and new cabinets this weekend, which is almost-brings-a-tear-to-my-eyes exciting. Renovating a kitchen is exciting, and I like being able to customize things to meet our needs, but I have been washing dishes in the bathtub for 6 weeks, you guys. I have been cooking all of our meals without a stovetop or oven. Everything we own is in the wrong place, and everything in the house, including me, is covered with drywall dust. We are working really hard and it is tiring. exhausting. Hence no blog posts. And I can't figure out how to put pictures on the blog from this computer, so sorry. No pics. I wanted to outline the whole kitchen remodel on here, so we would have a record of this project. But I am not so sure I want to remember this project when I am done--I will never renovate anything again, and we definitely have some fixing left to do in our house!
Garden-wise, I have been amazed how well our garden grows without our help....just turn sprinkler on the garden for like 15 minutes a day, and our garden continues to produce plenty for us. Mostly, we have been eating big salads, fresh from our garden. I have a grocery bag full of Kale waiting for a day with a stovetop to blanch and freeze. Our cabbage is also looking awesome, calling out for a cabbage roll (just looking for a really appealing crock-pot recipe)! And we are starting to get good tomatoes and cucumbers. If I could be friends with any produce, it would be tomatoes and cucumbers, so I am pretty excited. I have canning plans for those two buddies. My awesome mother-in-law helped me find the supplies I needed to can stuff, so again, we are just waiting for a stove (patiently, for the most part....).
So here is a "recipe" I can share with you. Since my cucumber plants are freaking insane, I harvested out all of those awesome carrots. Our half-pack of carrot seed strips netted us roughly 7 pounds of carrots--we have sandy sandy soil, which really helps our root veggies.
Creamy carrot soup, made without a stove:
5 or more pounds of chopped up carrots (I made 1/8 inch coins)*
1 quart chicken or veggie stock
1 coffee cup full of half and half (I used fat free and it worked fine).
3 tbsp finely chopped onion and garlic (just a mix of the two, to your taste)
1 spoonful of unsalted butter
1 small handful of rosemary
1 small handful of sage
*Measurements are totally, totally approximate
In a crock pot or the microwave, cook carrots in stock until softened. Stir in butter when the carrots are warmed but not yet soft.
Blend the carrots with some cream or half and half in the blender. Make sure not to blend it while it's really hot and make sure to blend it in small batches to avoid any potential danger.
Add sage and rosemary. Or, do nutmeg. Yum, that would be good. Add salt and pepper to taste.
Heat it up. Eat it and be happy.
There you go, if you grow carrots, sage, and rosemary, your soup is delicious and almost free. It makes tons of soup.
I promise we will try to write more, but I gotta say, I have a feeling I will be washing dishes that are already clean because I will be so excited to have a dishwasher. :)
Any good recipes involving basil? All three of my (store bought) basil plants are HUGE....and we have pesto for days......
Ok, until next time,
Happy planting (wait, it's August....) happy weeding!!
6.25.2010
The fumes were getting to me....
So, as you may know from reading this blog before today, the Jensons are in the process of buying a house. In fact, we just got our official closing date of Tuesday. We have a "unique situation": 1 full time student, my not being paid in the summer, the mortgage industry people being extremely nervous about loaning money (which, by the way, is their entire job), and the tax credit (aka $8,000 worth of improvements to our little house). Our "unique situation" translated into a HUGE PAIN IN THE MORTGAGE. Anyway, we are closing on Tuesday. Officially. Yahoo!
That's just background for what I was going to write about. Our second bedroom had wallpaper from the late 80s or early 90s on three walls. Not terrible, just not really our style. So, I decided to take it down. We used spray bottles full of either 1:1 vinegar and water or 1:1 fabric softener and water. Came down pretty easily. The fourth wall was covered with plywood paneling. It was actually pretty rough to the touch, not ideal for a potential future Jenson's bedroom. So, I pried that sucker down. With a hammer. It was very good stress management for me while waiting for the mortgage people to figure out whether or not we are worthy. Glad to know we are.
Behind the paneling was the original (or what we think is the original) wallpaper the original owners put up in 1940. They pretty much just welded the paper to the wall back in the day, so it took me two days to get it down. Two days of staring at the little blue-purple flowers.
Got me thinking. We are buying this house and making some changes--renovating the kitchen and bathrooms, finishing the basement, refinishing the floors, stuff like that. We own this little piece of turf. But really, this house has a life far bigger than we are. We are more apart of it's life than the other way around. 70 years ago, a woman picked out that wallpaper. A husband agreed to it. Someone told the contractor not to add texture to the plaster walls, so they could hang wallpaper. That contractor put up wallpaper paste and attached the wall paper to the walls. Babies fell asleep staring at that wallpaper. Someone else took the wallpaper off three walls and painted them blue. Another person put paneling over the one wall and left us this weird jumbley time machine of a second bedroom. and the next owner after us, whether it's in 5 years or 50, will look at things we have done and wonder what we were thinking as they roll paint over our color choices or rip up the floor we chose. Because we are more a part of this home's history than the home is a part of ours.
6.19.2010
Geek Gardening
Hello again garden fans,
Since we are recommending some of the best garden readings we've come across lately, I thought I would suggest an article from my favorite magazine: Wired. While many of you are the crunchy-granola, Kingsolver-reading types, some of you might be the type of person who is still pondering season six's flash sideways timeline (spoiler alert: I think it was Jack's afterlife). If you are that type, you may enjoy an article from the June edition of Wired. Geek or not, I think one and all will relish the tongue-in-cheek text and extreme plans for various sized garden plots. Joking aside, there are some really excellent gardening tips and ideas in this article, especially if space is at a premium for your veggie-plot or if you're thinking of taking the plunge and finally raising your own chickens.
A Wired Guide to Domestic Terraforming
6.18.2010
The Full Circle Book Club
Hello fellow gardeners!
I thought it would be fun to suggest some great books on full circle-related issues (gardening, living simply, cooking and food preservation, being awesome, etc). Those of you who are educators now have a little more free time, and you may like reading as much as I do....so dive in!
The first book I will recommend to you is:
Animal, Vegetable, Miracle by Barbara Kingsolver, Steven Hopp, and Camille Kingsolver.
Love, love, love this book. Barbara Kingsolver, who is such a lovely and funny writer anyway, takes on the challenge of living and eating locally for a year, with her family. The funny made-up word for this is locavore. It is a partial reason to almost every home garden I know of: people love the taste of veggies fresh from the ground, they love the sense of accomplishment when they grew it themselves, and they love the lowered economic impact of walking to the backyard for a tomato (as opposed to shipping one in from Peru). The book is so full of information! I am really pumped to take on some of the things she does (I can't wait to make my own ricotta), and I don't think I will ever be ready for other things (butchering is just a little bit more than I can handle). What I love about this is the move towards a simpler life. Sometimes, it seems like the bad in the world is too much to take on. And it is a lot. But maybe, we can try just focusing on our little corner of the world. If my little corner is better, the world is a little better. And when things calm down here, I can see the good more clearly.
You should check out the book. It's at stores and
libraries all over the place. Looks like this. The other picture is of Kingsolver and her family:
In other news, we are looking forward to closing on our house. This has been quite a process, to say the least. Those of you who have not yet purchased a home since the beginning of the recession, beware the complexities of the new mortgage world. I am totally pumped for some renovations, most significant of from http://www.sky-bolt.com
which being an overhaul on the kitchen. I love where we are, and we are really pleased to know we are going to have the right to stay here for as long as we'd like. How awesome is that?
Read the book, then tell me what you think, possibly theoretical readers of the blog!
Allison
I thought it would be fun to suggest some great books on full circle-related issues (gardening, living simply, cooking and food preservation, being awesome, etc). Those of you who are educators now have a little more free time, and you may like reading as much as I do....so dive in!
The first book I will recommend to you is:
Animal, Vegetable, Miracle by Barbara Kingsolver, Steven Hopp, and Camille Kingsolver.
Love, love, love this book. Barbara Kingsolver, who is such a lovely and funny writer anyway, takes on the challenge of living and eating locally for a year, with her family. The funny made-up word for this is locavore. It is a partial reason to almost every home garden I know of: people love the taste of veggies fresh from the ground, they love the sense of accomplishment when they grew it themselves, and they love the lowered economic impact of walking to the backyard for a tomato (as opposed to shipping one in from Peru). The book is so full of information! I am really pumped to take on some of the things she does (I can't wait to make my own ricotta), and I don't think I will ever be ready for other things (butchering is just a little bit more than I can handle). What I love about this is the move towards a simpler life. Sometimes, it seems like the bad in the world is too much to take on. And it is a lot. But maybe, we can try just focusing on our little corner of the world. If my little corner is better, the world is a little better. And when things calm down here, I can see the good more clearly.

You should check out the book. It's at stores and
libraries all over the place. Looks like this. The other picture is of Kingsolver and her family:
In other news, we are looking forward to closing on our house. This has been quite a process, to say the least. Those of you who have not yet purchased a home since the beginning of the recession, beware the complexities of the new mortgage world. I am totally pumped for some renovations, most significant of from http://www.sky-bolt.com
which being an overhaul on the kitchen. I love where we are, and we are really pleased to know we are going to have the right to stay here for as long as we'd like. How awesome is that?
Read the book, then tell me what you think, possibly theoretical readers of the blog!
Allison
5.30.2010
Hurrah! Our first harvest!!
What's that sound? The sound of hard work paying off! We got to harvest our radishes today. Well, we still have some in the ground, but really, the radishes are ripe and ready to go. Yum. I always go for radishes in the relish tray, and they are one of Desmond's favorite, so this is more exciting than it might sound like to you. From just maybe a third of one packet of seeds, (seed strips, actually--an awesome invention) we got more than a 2.5 quart bowl-full of radishes. More than we can eat by far.
That's what makes gardening such a great way to make friends: We sent three pint-sized bags of Radishes off with people today. People who are going to think we are nice and be more than happy to help us out with our new house projects. Clever.
For a good radish recipe, I turned to one of my favorite cookbooks, Simply In Season. This cookbook, along with its buddy cookbook, More With Less are put out by the Mennonite community and are largely about cooking and eating foods in a way that benefits the body, the wallet and the world around us. Triple threat.
So, without any further ado, my favorite radish recipe from Simply In Season:
Marinated Radish Salad:
8 Large bunches sliced radishes
8 green onions, sliced
1/4 cup fresh dill (or 1 tbsp dill seed)
Combine.
1/2 cup olive oil
1/4 fresh lemon juice
1 tsp sugar
1 tsp dijon
1/2 tsp salt
pepper to taste.
Stir, pour over radishes, and toss. cover and refrigerate 2-4 hours (no longer) remove from fridge 30 minutes before serving, and stir.
6 oz Swiss cheese (shredded)
sprinkle on the top just before serving.
Eat. It's awesome and delicious. People will be so excited to eat up all the fabulousness you just made.
What do you do with your little ruby red spicy delicious radishes?
5.19.2010
More BPAwful news
Hello garden buddies!
More bad news on the BPA front. BPAs (Bisphenol A) has been found in most canned foods and drinks. Pretty much anything we wrap up in metal. Not a chemist, and I won't pretend to be--but I will say that studies show that pregnant women who take in a lot of BPAs may negatively impact the health and development of their baby. Suck-o. It might not cause problems, but it is worth thinking about.
This got me thinking about convenience foods in general, and what makes our hearts skip a beat when we walk through the grocery store aisles. Progress. Interesting idea. Seems like sometimes, we are better off staying closer to the dirt--the more steps between the dirt and our bellies, the more things to go wrong. And that's lame. Our hope would be that a couple of people read about how we are doing our little garden, how much produce we are getting out of it, how clueless we are, and think maybe they should give it a shot too. Why let big veggie have the chance to control what you are eating? BPAs, pesticides, underpaid workers, and big veggie putting small farmers out of business don't need to worry you anymore when you take that little bit of money from Green Giant and keep it in your pocket.
If you want more information about BPAs, you can read about it here: http://health.usnews.com/health-news/family-health/cancer/articles/2010/05/19/health-buzz-bpa-lurks-in-most-canned-foods-study-finds.html
Happy Planting!
D&A
5.17.2010
Fabulous florals
Happy Monday to everyone!
It's a beautiful day here in the great state of Minnesota, and we are happy that the birds are singing, the plants are sprouting, and summer vacation is fast approaching! We have been behind on our posts for the past few weeks, as you may have noticed. My handsome husband the law student was getting through his finals and getting re-accustomed to having to work every day (his part time research assistant job becomes full time this summer, which is awesome). In the midst of the busiest time of the school year, my final projects for my class work for my masters, Desmond starting his new job, and his finals, we decided to buy our house. Good timing, Jensons. We have signed our purchase agreement and we are really pumped to close in a few short weeks. Needless to say, we have been spending a lot of time busting stress by gardening, not by writing about it.
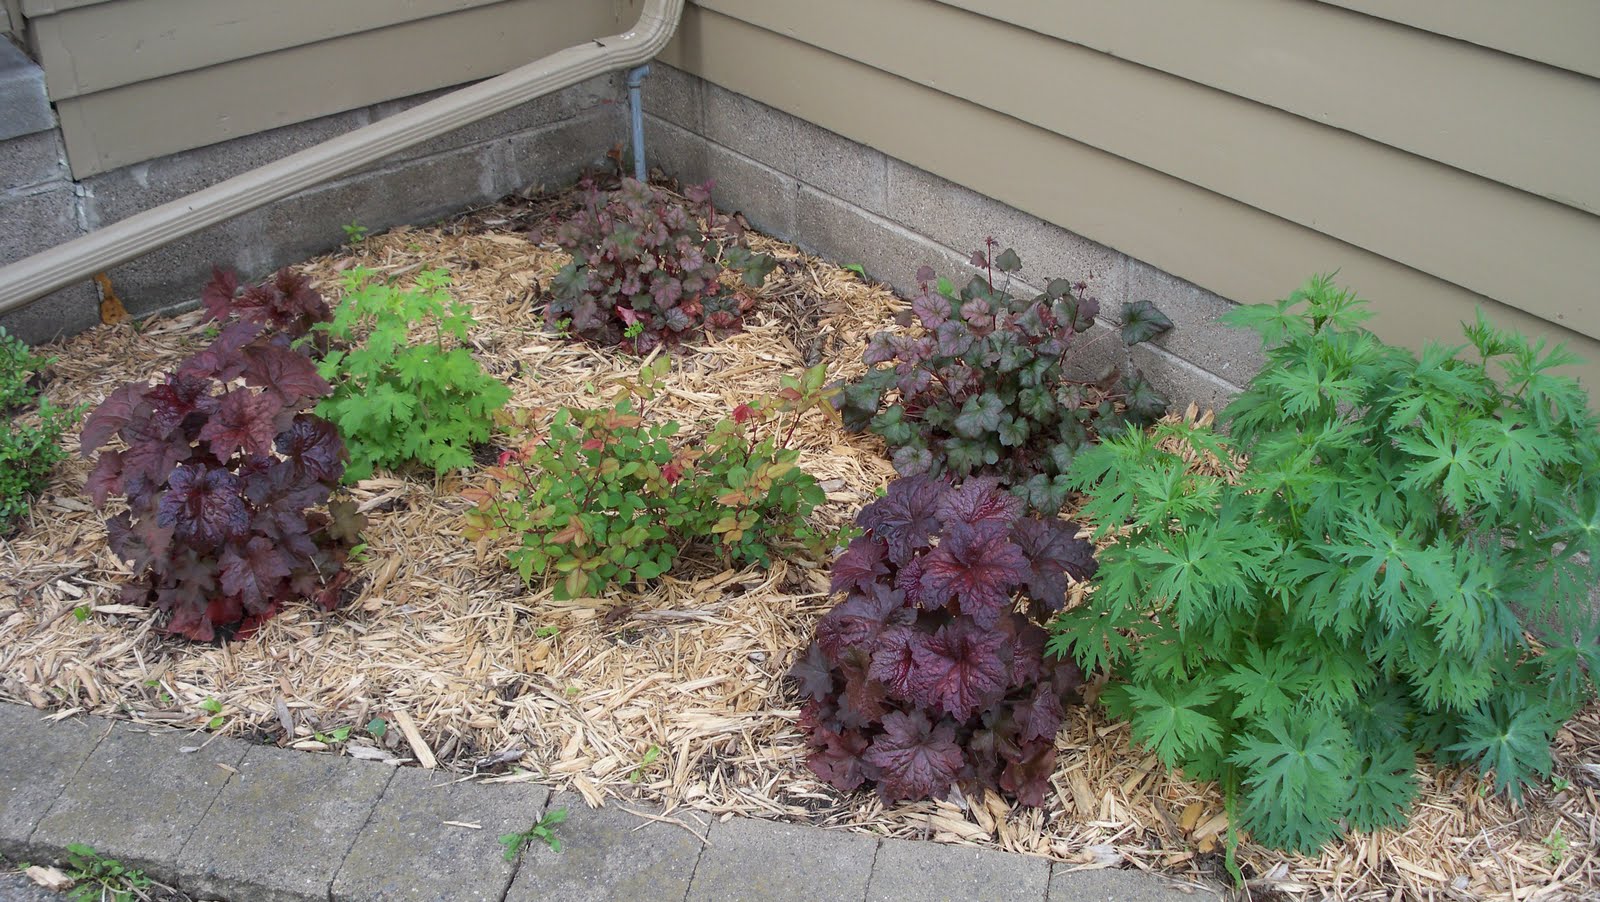
Here are some pictures of our beautiful flower beds. When we first moved in, our flower beds were full of three things: weeds, hostas, and daylilies. For those of your who don't know, Hostas and daylilies are really just pretty weeds: Control your plantings or they will go out of control! Our garden had lost control, but we have now planted a lot of beautiful perennials: roses, coralbells, daisies, black-eyed susans, and sedum. There is lots of other stuff that we don't know the name of, and a few things we just planted this year.


We have been burned by dead flowers before. Here are some tips:
1. Perennials come back. Annuals don't. Annuals work well for container plants, BUT you will need to buy a new one each year. We suggest you spend a bit more for the perennials.
2. Pay attention to the little tag thing: light vs. shade, water a lot vs. no water--if you plant stuff in the wrong spot or water too much or too little, they will die and you will be sad.
3. Consider height and color. A tall plant in front of a short plant will create a lot of shade.
4. Some stores, like Lowe's, take back plants for a year if they die. A good investment for those of us that make lots of mistakes (like me)....


We are pretty happy with our outdoor progress, and we can't wait to start bringing you more of our indoor progress as we work hard to make our 1940 bungalow into the energy efficient and beautiful home of our dreams!! Soon enough we will be wielding hammers as often as a spade, and we couldn't be more thrilled!
Happy Gardening,
Allison (and Desmond)
It's a beautiful day here in the great state of Minnesota, and we are happy that the birds are singing, the plants are sprouting, and summer vacation is fast approaching! We have been behind on our posts for the past few weeks, as you may have noticed. My handsome husband the law student was getting through his finals and getting re-accustomed to having to work every day (his part time research assistant job becomes full time this summer, which is awesome). In the midst of the busiest time of the school year, my final projects for my class work for my masters, Desmond starting his new job, and his finals, we decided to buy our house. Good timing, Jensons. We have signed our purchase agreement and we are really pumped to close in a few short weeks. Needless to say, we have been spending a lot of time busting stress by gardening, not by writing about it.
Here are some pictures of our beautiful flower beds. When we first moved in, our flower beds were full of three things: weeds, hostas, and daylilies. For those of your who don't know, Hostas and daylilies are really just pretty weeds: Control your plantings or they will go out of control! Our garden had lost control, but we have now planted a lot of beautiful perennials: roses, coralbells, daisies, black-eyed susans, and sedum. There is lots of other stuff that we don't know the name of, and a few things we just planted this year.


We have been burned by dead flowers before. Here are some tips:
1. Perennials come back. Annuals don't. Annuals work well for container plants, BUT you will need to buy a new one each year. We suggest you spend a bit more for the perennials.
2. Pay attention to the little tag thing: light vs. shade, water a lot vs. no water--if you plant stuff in the wrong spot or water too much or too little, they will die and you will be sad.
3. Consider height and color. A tall plant in front of a short plant will create a lot of shade.
4. Some stores, like Lowe's, take back plants for a year if they die. A good investment for those of us that make lots of mistakes (like me)....

We are pretty happy with our outdoor progress, and we can't wait to start bringing you more of our indoor progress as we work hard to make our 1940 bungalow into the energy efficient and beautiful home of our dreams!! Soon enough we will be wielding hammers as often as a spade, and we couldn't be more thrilled!
Happy Gardening,
Allison (and Desmond)
5.16.2010
Progress...
Hello Garden Enthusiasts,
It has been a while since we last gave you a glimpse at our garden. It has been a busy few weeks. We are in the process of buying the house that we are currently renting. The closing will be coming up later this summer but we are under contract right now. We are very excited but as you can imagine it has been a very consuming process so we haven't had a chance to update the blog. Without further ado, here are some pictures.
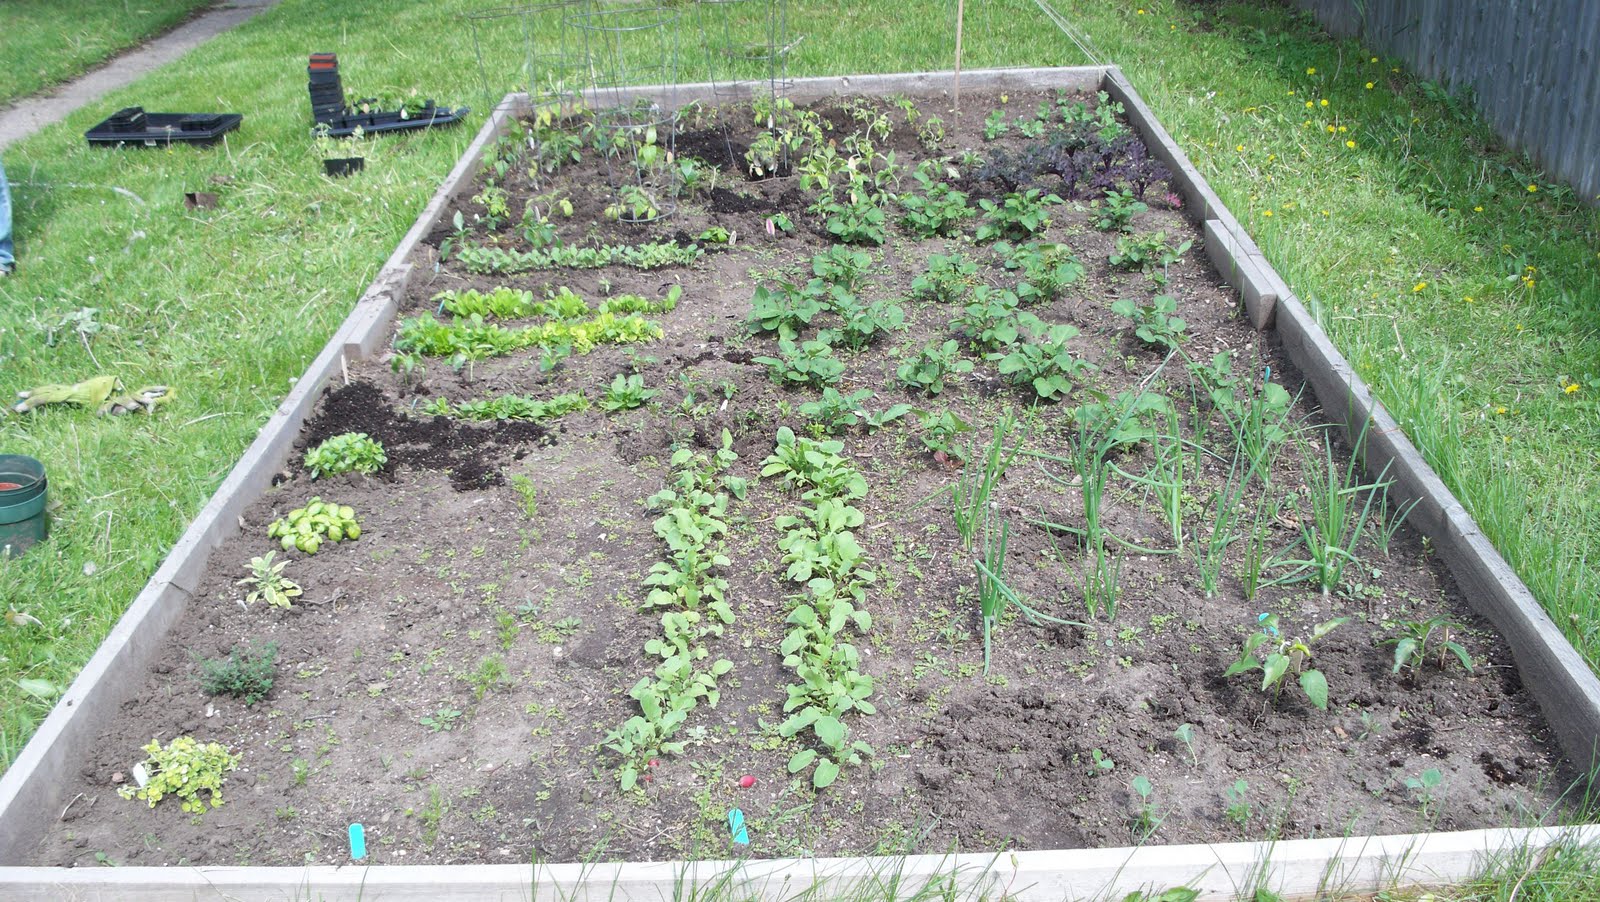
 Here's an overview of the whole vegetable garden. Everything is up and some of it is getting pretty big. The potatoes are off to a great start. The onions are looking very healthy. Some of the radishes have already been harvested.
 Here's another view of the veggies. You can see some height in this picture. The herbs are in the front on the left. The carrots are in the foreground. They're still small but eventually they'll be delicious. The radishes are behind them on the right. The onion stems are behind the radishes on the right. The potatoes can be seen in the back in the center and the salad greens are in the back on the left.
We're less than a mile from the Mississippi River and as a result we have very sandy soil. Root vegetables like radishes and potatoes do very well in our garden. We had a very warm early spring so we were able to get most of our seeds in early. We are hoping to have a bumper crop this fall. Hopefully the rest of the summer is kind as well.

Holy Rhubarb! It's a well known fact that rhubarb, once established, is really easy to grow. We don't even make an effort to water ours. There are actually four separate plants in there. I believe last year we only had three. One plant went to seed while we were away for a weekend. If you don't want more rhubarb make sure to remove the tops once you see buds. We made some rhubarb crisp a few weeks ago with some of the nicer stalks. The recipe will be coming soon.
We'll try to give you an update again very soon but hopefully these pictures will tide you over. Enjoy the weather!
-D&A
It has been a while since we last gave you a glimpse at our garden. It has been a busy few weeks. We are in the process of buying the house that we are currently renting. The closing will be coming up later this summer but we are under contract right now. We are very excited but as you can imagine it has been a very consuming process so we haven't had a chance to update the blog. Without further ado, here are some pictures.
 Here's an overview of the whole vegetable garden. Everything is up and some of it is getting pretty big. The potatoes are off to a great start. The onions are looking very healthy. Some of the radishes have already been harvested.
 Here's another view of the veggies. You can see some height in this picture. The herbs are in the front on the left. The carrots are in the foreground. They're still small but eventually they'll be delicious. The radishes are behind them on the right. The onion stems are behind the radishes on the right. The potatoes can be seen in the back in the center and the salad greens are in the back on the left.
We're less than a mile from the Mississippi River and as a result we have very sandy soil. Root vegetables like radishes and potatoes do very well in our garden. We had a very warm early spring so we were able to get most of our seeds in early. We are hoping to have a bumper crop this fall. Hopefully the rest of the summer is kind as well.

Holy Rhubarb! It's a well known fact that rhubarb, once established, is really easy to grow. We don't even make an effort to water ours. There are actually four separate plants in there. I believe last year we only had three. One plant went to seed while we were away for a weekend. If you don't want more rhubarb make sure to remove the tops once you see buds. We made some rhubarb crisp a few weeks ago with some of the nicer stalks. The recipe will be coming soon.
We'll try to give you an update again very soon but hopefully these pictures will tide you over. Enjoy the weather!
-D&A
4.13.2010
Sprouts!
I will have to add pictures later, but for those truly interested in the status of our garden:
Radishes have sprouted. Cute little rows of little leaves.
Cabbage has sprouted. I have found a whole mess of cabbage recipes that I am dying to try, so I am excited!
Romaine and arugula are both sprouting up nicely.
Should be delicious over at casa Jenson starting shortly!
Also, we are hoping to have a big announcement for you all reading at home in the next few days. Normally, when people in their twenties say things like "big announcement," I know you all assume the same thing, so I will just go ahead and let you know that I am absolutely not pregnant. The belly is strictly from my deep love of all things food.
4.09.2010
Question to all of you gardeners
I love basil. I love it all the time. I have tried to plant it in sunny spots and water it daily and give it worm juice for food (my grandpa is a worm juice farmer) SO WHY DOES MY BASIL KEEP DYING? Help me, please! I just found a new pesto recipe, and I am a good share-r....
Happy Friday!
Allison
Happy Friday!
Allison
4.04.2010
Aaaaaaaaaaand we're off!
Garden is in! Not all the way, of course: we still need to put in the cucumbers, tomatoes, zuchinni, squash, and eggplant. However, we dug around in the dirt for a few hours on Saturday and Sunday. It took a little extra time, because we had to rip out all of these little tiny trees that had apparently planted themselves in our garden over the winter. After getting the trees and the weeds out and grating our the soil, we were ready to plant. Now, we had treated the soil by adding in some compost a few weeks ago. Tedious, but now it's done!
 So far, we have planted: broccoli, onions, kale, potatoes (both red and white, but no sweet potatoes, unfortunately), some more herbs, romaine lettuce, arugula, cabbage, spinach, radishes, and carrots.
 And, I might add, looking cute and like it will be delicious.
Oh, and check out our really cool looking rhubarb:

Wahoo!
The Jensons
4.01.2010
Big endeavors for jardin de Jenson
So, as you may know, this garden thing is in part an effort to green up a little bit, and an effort on Allison's part to channel Laura Ingalls Wilder. But, most of all, we wanted to save money. You know how it is: the economy, the single income thing, the price of food, and so on.
Then, we had a brilliant idea: why just save money when we could MAKE money off of our garden??
Desmond is using his deep knowledge of all things science-y (thank you, Wikipedia, for the free education on everything), and Allison will be managing our new crop: corn. We are plowing up everything we can and just growing corn. Grass? out. Trees? out. Herbs, flowers? out, out. Veggies? Well, if it's corn, it's in. Otherwise, out. We will be plowing up the concrete if the landlord okays it, and then: corn driveway.
Here are some of the many things we will be making with our corn; popcorn, delicious movie treat; cornmeal, mmmm cornbread; Corn starch, for thicker gravy; Xanthan gum, for spelling bees. Sorbitol, food additive to many of our favorite non-expiring treats; Hominy, corn soaked in lye, yum; Maltodextrine, no explaination needed; High fructose corn syrup, for the people in those commercials; Corn mash, for our moonshine makin' side business; Gum arabic, which I am pretty sure is in Snapple; Dextrose, which you probably use with the maltodextrine; Corn cob pipes, in case Frosty comes to town; tetrahydrofurfuryl alcohol, used to make paint and varnish (who knew?); monosodium glutamate, better known as MSG; and ethanol, which makes me feel better about my Escalade.
 Hmmm... I don't know if we have a future in satire. Hopefully, Big Veggie doesn't find out about our lil blog.
All April fools joking aside, we both love delicious corn on the cob in the summer, but we choose to get it from the farmer's market, because it isn't the best for your soil. Interesting to learn what all shows up in the stuff we now consider food, isn't it?
Did you hear/ see any truly hilarious April fools jokes today?
Wishing you a corn by-product free evening,
the Jensons
Awesome image by Natalie Dee.
3.31.2010
Dressing up your salad.
So, if you have ever gardened, you know that one of the first and most plentiful veggies you get is salad greens. Especially if, like us, you plant a lot of salad greens. Now, hopefully you know about the amazing versatility of spinach. Maybe I will write a whole post just about the amazing number of things you can do with spinach. Popeye got that one right, friends. Spinach is awesome.
But this post isn't about spinach. It's about salad dressing. Since a garden = lots of salad greens, and we want to eat what we grow, we eat a lot of salads. Some for meals, some for side dishes. What was that? You want to know how we dress our salads? Well, I will tell you: we make our own salad dressing!
I don't know who it was over at "big salad" who convinced us otherwise, but seriously friends, salad dressing is unbelievably cheap and easy to make. You probably have all of the ingredients in your house right now. And a jar of dressing costs probably like 40 cents. Not only is it cheap and easy, but people will think you are fancy and they will be intimidated by you, and they will think that you did something special, and it will take you like 15 seconds.
I made some salad dressing today to take with a supper (fantastic veggie lasagna, recipe will be forthcoming, and a salad) to take to my awesome cousins and their new baby Aldous. I am in love with that kid: a totally awesome mellow beautiful little man.
Here is what you do:
1. Gather your ingredients. You probably want an oil, a vinegar, and some seasonings. I usually use fresh or dried herbs and salt and pepper. You can add fruit, citrus juice, mustard, hot pepper seeds, sesame seeds, or other things. Pretty much whatever.
2. Put like 1/2 of a cup of oil, 1/4 cup vinegar, and other ingredients to taste, into a mason jar with a lid.
3. Close jar and shake.
4. Taste the dressing and add stuff if you want.
5. Eat it. Awesome.
Ok, so I know that you can get salad dressing seasoning packets. Or, you can look at the ingredients list on the packet and pick them our of your garden or get it at the farmer's market. This makes your salad dressing preservative free. Doesn't even need to go in the fridge, if you don't want it to. We also play around with different vinegars and oils and what we add in. If you want ranch dressing, just swap the oil and vinegar for mayo and buttermilk. The only thing we wouldn't make ourselves is Caesar dressing, and that is an raw egg fear plus anchovy gross out factor for us.
Oh, and if you don't have any, you should go get some mason jars. You can do a lot of stuff with mason jars, and they can be frozen or heated way up.
In summary: STOP SUPPORTING BIG SALAD. Don't be afraid of salad dressing: if you can "shake well before opening," YOU CAN DO THIS.
3.29.2010
Herbs for everyone!
Hmmm...
So I wrote this post yesterday, and then couldn't figure out the picture poster thing. Still couldn't get the picture of the herb garden picture to upload. So, you'll have to use your imagination. The plants are green, the soil is brown, and they all look fresh and happy and herby. Expect another post later today about the new curtains I made. Stay tuned for more news from casa Jenson....
Happy Spring Break to me! I am excited to get to dig around in the dirt and in the house. Here are some projects I want to take on:
1. Planting our little herb garden (done)
2. Making curtains for our windows currently covered by EXTREMELY gross vinyl blinds.
3. Planting our early veggies (radishes, spinach/greens, and peas all love the cool weather). And some perennials in our flower beds, if I get a chance.
4. Possibly painting the pantry (currently a dirty yellow color)
5. Some school work (of course)
6. Lots of sitting around, watching TV, and sleeping in.
Herb Garden:
Our little Aerogarden looks a little sad now, all herb-less:
.jpg)
But I think the herbs look happy in their new home!
Our raspberry bush, complete with one leaf (give it time...)
.jpg)
Our tomato plant is practically dripping with tomatoes. We easily have gotten a pint of cherry tomatoes so far, and it's still march!
.jpg)
Signs of spring all over the place!!.jpg)

What signs of spring are getting you the most jazzed up?
WAHOO!
Allison
So I wrote this post yesterday, and then couldn't figure out the picture poster thing. Still couldn't get the picture of the herb garden picture to upload. So, you'll have to use your imagination. The plants are green, the soil is brown, and they all look fresh and happy and herby. Expect another post later today about the new curtains I made. Stay tuned for more news from casa Jenson....
Happy Spring Break to me! I am excited to get to dig around in the dirt and in the house. Here are some projects I want to take on:
1. Planting our little herb garden (done)
2. Making curtains for our windows currently covered by EXTREMELY gross vinyl blinds.
3. Planting our early veggies (radishes, spinach/greens, and peas all love the cool weather). And some perennials in our flower beds, if I get a chance.
4. Possibly painting the pantry (currently a dirty yellow color)
5. Some school work (of course)
6. Lots of sitting around, watching TV, and sleeping in.
Herb Garden:
Our little Aerogarden looks a little sad now, all herb-less:
.jpg)
But I think the herbs look happy in their new home!
Our raspberry bush, complete with one leaf (give it time...)
.jpg)
Our tomato plant is practically dripping with tomatoes. We easily have gotten a pint of cherry tomatoes so far, and it's still march!
.jpg)
Signs of spring all over the place!!
.jpg)

What signs of spring are getting you the most jazzed up?
WAHOO!
Allison
3.27.2010
Here comes Peter Cottontail...
We have had several people ask us how we keep bunnies out of our garden. You might get a few bunnies now and again, but there are a few things that we have found really effective in bunny avoidance:
1. Get a cat. Walt is an indoor cat, but we put his cat hair into the garden when we brush them. For bunnies, cat = death = avoid that garden.
2. If you don't have a cat but live in an urban area, plant a little catnip near your garden. Catnip spreads like crazy, so you might want to use a container to plant it. Catnip = stray cats = cat smell = bunnies avoid the garden.
 Walt is all business.
3. If you don't like cats, you might try some kind of barricade. Bunnies don't really jump over stuff, in spite of their jumpy nature. Get like those little bunny fences: 4 - 6 minimum should do it.
4. Bone meal or blood meal in the soil will keep bunnies away. It will also keep me away, so we don't use it. Gross, but effective!
5. If the bunnies are going after specific plants, try dissolving a little cayenne pepper into some water and spraying it on the plants. Good for squirrels too! I wouldn't recommend this if you have children or dogs that might also be eating your plants....
Ok, well, I hope you can keep your garden bunny free! We are enjoying a weekend visit from a friend, and then it will be on to dig in the dirt!!
3.25.2010
So, I haven't shared much about my job here on the blog here. That's for a few reasons:
1. This blog is about my garden. My job and my garden rarely collide (a fact I really like)
2. I don't want to be one of those people who says something about their job on the internet and gets fired. I like my job, and I like getting paid and having health insurance and all that. I mean, Obama has helped us out with the health insurance, but we are a 1.5 income family right now, and it would be hard to be a .5 income family, even if doctor visits were covered.
Bet you guys didn't know that Faulkner learned how to write a sentence from me. Sorry about that.
Today my two worlds collided, and so I thought I would share and seek guidance.
Anyway, I am a special education teacher in a fairly urban high school in Saint Paul. I teach students who are in special education classes for 60% or more of the day. They are learning to deal with a variety of disabilities; most of my students have mental health problems and/or Autism spectrum disorder.
My job is awesome. I work with hilarious, smart, challenging, and bizarre people. I never come home without some story to tell Desmond.
Today we were discussing the possibility of doing some gardening as a class. We were thinking of doing a flowering plant of some sort that students could bring home as a "important person in my life day" gift (a lot of my students do not have mothers present in their lives, so we celebrate EVERYONE on Mother's day). We also do a end of the school year picnic, and I was thinking to see if we could get some salad greens or radishes going, that we could eat at the picnic. The kiddos might like the chance to grow their own food, and there are a lot of lessons (social skills and science and stuff) that we could get through the growing process.
So here's the question: is growing flowers or veggies too "young" for high school? How can I make it cool without losing the process? Teachers, parents, gardeners out there: thoughts?
In other news: my raspberry shoot (still on the windowsill) has started to sprout little leaves! Lots of ripe (or close to ripe) cherry tomatoes. No growth in my little seedlings, but I am patient.
Peace out,
Allison (Desmond likes you too)
3.24.2010
Project #2-lil indoor compost holder

Yeah. That's what I would buy if we were going to be swank about this. We need something to put our kitchen waste in so we aren't running across the yard every time we make a snack. Last year we found this awesome plastic trash can thing in the garage and it totally did the job...for like a month, before it completely fell apart. This may be why it lived in the garage with the mice and the old broken down car. So I started looking for something cute, like this super cute little stainless steel buddy that has a charcoal filter to prevent kitchen stinks from ruining your appetite. I fought that shopping urge and took one of our tupperwears we got from Ikea and labeled it. The label is only to prevent confusion between compost and leftovers. Not exactly deep philosophy or all that interesting, but we have really been making an attempt to make do with just what we've got more often. Good for the earth and the wallet and our sense of ingenuity.
 Here it is. Note the delicious ripe cherry tomato towards the bottom of the plant. That sucker is just itching to spread its roots out.
Garden news: I totally got to eat a delicious, ripe, beautiful cherry tomato today! I want to dig in the dirt and plant, but I really want the overnight lows a little higher first. The way I figure it: when we are comfortable 24 hours a day without the heat on, our little seed friends will be comfortable in their new dirt home.
Begging the sun gods for a bit more warmth,
D and A
3.23.2010
Just a little thing.
Isn't it funny that it's trendy to be "green" now? So many people are busy running around buying tons and tons of (green) stuff to replace stuff we already have, when my grandma is probably "greener" than most of us, because she DOESN'T go out and buy tons and tons of stuff to replace stuff she already has. And I have no proof, but I have a feeling Grandma Heille don't do recycling. Irony is thick on this one. So, while I suppose I want people to think I am as cool and green as can be, but I don't do yoga or shop at expensive grocery stores.
Ok, but I do want to be green. Green and awesome. And we don't have lots of money to spend on stuff, so we are trying to find ways to spend less money but still have a positive impact on the world around us. I stumbled upon a neat little tip this week and I thought I'd share.
We get our groceries at Rainbow, because (among other things) Rainbow has an awesome bulk foods section. Good way to save money on nuts and dried fruit and other potentially expensive things, because you only have to buy what you need, and all that. So, bulk foods is right by bulk coffee, and so I snagged a few of the paper, durable coffee bags for my bulk stuff instead of those crappy plastic bags. Benefits to paper bags:
1. Hold more
2. Totally reusable
3. Recyclable (they are just paper)
4. Fold over to keep food inside and other stuff out.
5. Makes you feel like a renegade, because they are technically for coffee, NOT cashews (I take it where I can get it)
Yup. Let's all start a revolution of buying less to help the earth. Because I don't think the rainforest is worried that your yoga bag isn't made out of organic cotton.
Um, no garden update today. Everything is the same as yesterday. Spring break looms ever closer....that's when the action starts.
Peace out,
Allison (and Desmond)
3.22.2010
Tabula Rasa...more or less...
So, it's easier to take pictures with the sun out. How about that. Here is what we are working with for our veggies--a few small plots spread throughout the yard to take advantage of the sun. We have these massive trees that block sun in part of our yard:

So, our plants are spread throughout. We will have our raspberries in the area with the most direct sun. I am sort of hoping we have room for blueberries and strawberries too, but it is a little space, and I am not anticipating getting much fruit this year anyway, so we'll just have to wait and see:
Here is our tiny little herb garden. Last year, we planted herbs in the big bed with the veggies, but that made it harder to do companion planting because of space, so I am hoping this will work--right outside the kitchen door!

Our big bed, where most of our veggies will be planted. We were able to pull an impressive amount of produce out of this plot last year, and I have high hopes for this year--we had several mistakes to learn from. This is where our tomatoes, cucumbers, greens, and root vegetables will be growing--the soil in the garden plot is really sandy, so we've had good luck with root veggies in the past:

Here's where we plant our rhubarb, squashes, and melons. Lots of room to spread out:

And look! In comes our rhubarb! That is really exciting!
Finally, We will be installing some lattice and planting our climbers over here in the boxes. They will get good light if we get them into the right spot. Here we will be planting pea pods and pole beans:

And here is our little compost bin. Right now, it's half full, so we should be able to get through much of the season with our kitchen waste, ashes from our fire pit, and probably some of the insane amounts of leaves we didn't rake up last year. Not my best procrastination decision.

So, that's our yard! We also have several flower beds that we are trying to fill up with perennials and make a bit more full and colorful and not fussy.
We're getting really pumped up!!
D and A

So, our plants are spread throughout. We will have our raspberries in the area with the most direct sun. I am sort of hoping we have room for blueberries and strawberries too, but it is a little space, and I am not anticipating getting much fruit this year anyway, so we'll just have to wait and see:

Here is our tiny little herb garden. Last year, we planted herbs in the big bed with the veggies, but that made it harder to do companion planting because of space, so I am hoping this will work--right outside the kitchen door!

Our big bed, where most of our veggies will be planted. We were able to pull an impressive amount of produce out of this plot last year, and I have high hopes for this year--we had several mistakes to learn from. This is where our tomatoes, cucumbers, greens, and root vegetables will be growing--the soil in the garden plot is really sandy, so we've had good luck with root veggies in the past:

Here's where we plant our rhubarb, squashes, and melons. Lots of room to spread out:

And look! In comes our rhubarb! That is really exciting!

Finally, We will be installing some lattice and planting our climbers over here in the boxes. They will get good light if we get them into the right spot. Here we will be planting pea pods and pole beans:

And here is our little compost bin. Right now, it's half full, so we should be able to get through much of the season with our kitchen waste, ashes from our fire pit, and probably some of the insane amounts of leaves we didn't rake up last year. Not my best procrastination decision.

So, that's our yard! We also have several flower beds that we are trying to fill up with perennials and make a bit more full and colorful and not fussy.
We're getting really pumped up!!
D and A
Project #1: Drying and storing our herbs
So, yet another reason I have been looking forward to knowing more about where my food came from: here I am, at home on a Monday, recovering from an overnight bout with food poisoning (self-diagnosed). Not fun--for either of us. Whenever I am home sick, I get hit with that need to be productive for like 15 minutes. Hence this little project, which took about that long. We have a neat little grow lamp that we got from my awesome cousins for a wedding gift, and we use it to grow herbs. Here it is, just after I gave the herbs a little haircut:

We put 8 of little nails into the side of the cabinet, so that I can cut and dry the herbs. Our nails were all full, and the oregano met a tragic end in some dishwater yesterday, so I figured it was time to come up with a better storage option. Luckily, I had saved some old spice jars, so, with a little label from a sharpie, We have some newly jarred herbs:

Pictured here is mint, rosemary, epazote, sage, and red rubin basil. I've never cooked with Epazote before, but the high price tag at Penzey's and the turpentine smell it produces has me curious. Anyone know a good recipe?
This gave me room to dry some more basil:

Can you believe the size of those leaves? I just want to curl up inside it. But instead I have been putting it on egg sandwiches.

And, of course, the little dried leftover stems and the (biodegradable) twine, all ready for the compost. Full circle:

Here are pictures of our seedlings, or maybe I should say future seedlings. We are starting some bell peppers and soybeans and rosemary early, but most everything else will just be planted in the soil. We also got this awesome little cherry tomato plant from Desmond's parents. A couple are already turning orange-ish, and my mouth is watering--a little basil, a little mozzerella, a little olive oil, a little bread and the boiler....


So, we are in an herb nirvana!
Total spent on this project: $0 (seeds and grow lights were a gift, everything else was stuff we already had)
Total saved: I don't know, like $25ish dollars. Epazote is really pricey!
Total time spent: About 20 minutes.
Hmmm...one more step towards paying off that initial investment! I am consulting with experts to see the best time to plant--coming up soon!
That's all for now,
a and d
3.21.2010
Challenge: From Dirt to Table to Dirt.
Hello friends!
We are just two ordinary people who have decided to embark on an epic journey: we will grow our own vegetables for a year. We had our first vegetable garden last year, and were able to reap a pretty significant harvest--not bad for two young kiddos, starting out with just grass and a dream and balancing work, school, and our wedding.
This year, we are hoping to kick things up a notch: we will grow vegetables, herbs, and fruit and preserve our produce (freezing, drying, and canning) and use our home-grown bounty in at least one meal each week (we would do more, but winters get long...).
So that's how we get from dirt to table. To get back to the dirt, we are composting everything we can, from our zucchini butts to our corn husks and turning them right back into dirt. The dirt that we will use to grow more vegetables, which will lead to more meals, which will lead to more waste, which will lead to more dirt. Full circle. (So that's where the name came from).
So the nitty gritty: We live in South Saint Paul, just outside of Saint Paul. Allison, a teacher, will get the pleasure of tending the garden this summer when not in class. Desmond, a law student and research assistant, will get to enjoy the fruits of her labors (and probably help quite a bit, too!). Our garden plot was tilled right out of the lawn. It's about 6 'X 15'. We also have a little plot where we grow herbs, a separate place for our raspberry bush, and a little plot for the windiest of plants (squashes and melons).
What's going into jardin de los Jensons?
Raspberries Cucumbers Rhubarb Spinach Lettuce Pole Beans Soy beans
Tomatoes Carrots Winter and Summer Squash Sweet peas Melons
Radishes Cabbage Broccoli Hot Peppers Sweet Peppers Onions Potatoes Sweet Potatoes Various herbs Flowers (and maybe some other stuff too)
Total spent so far in 2010: about $105 on seeds.
Total saved so far in 2010: about $40 (on fresh herbs grown in our little indoor grow lamp).
We aren't budgeting for time...I suppose we've spent a few hours raking out gross leaves and turning our compost from last year into our soil.
Tune in soon for some pictures and more as we gear up for planting. We are excited to see how far we can take this: it is my dream to grow almost all of our produce but be able to stay in an urban area...hmmm....pretty sure I've got this one.
Peace,
allison and desmond
Subscribe to:
Posts (Atom)
